一步两步是魔鬼的步伐

Duan1v's Blog

Load data导入csv文件

场景

  • 数据量较大且需要较高的导入效率
  • mysqlimport本质就是对load data语句的封装
  • 本次使用的csv文件是50m,36w行,12列

具体实践

  • 创建数据表
 1
 2
 3
 4
 5
 6
 7
 8
 9
10
11
12
13
CREATE TABLE `my_user` (
  `id` int unsigned NOT NULL AUTO_INCREMENT,
  `name` varchar(255) CHARACTER SET utf8mb4 COLLATE utf8mb4_general_ci NOT NULL DEFAULT '',
  `age` tinyint NOT NULL DEFAULT '0',
  `email` varchar(255) CHARACTER SET utf8mb4 COLLATE utf8mb4_general_ci NOT NULL DEFAULT '',
  `country` varchar(255) COLLATE utf8mb4_general_ci NOT NULL DEFAULT '',
  `type` tinyint NOT NULL DEFAULT '0',
  `job` varchar(255) COLLATE utf8mb4_general_ci NOT NULL DEFAULT '',
  `brief` varchar(255) COLLATE utf8mb4_general_ci NOT NULL DEFAULT '',
  `created_at` datetime NOT NULL DEFAULT CURRENT_TIMESTAMP,
  `updated_at` datetime NOT NULL DEFAULT CURRENT_TIMESTAMP ON UPDATE CURRENT_TIMESTAMP,
  PRIMARY KEY (`id`)
) ENGINE=InnoDB DEFAULT CHARSET=utf8mb4 COLLATE=utf8mb4_general_ci;
  • 准备csv文件,可以使用Navicat自动填充数据,再导出成csv,我的csv名为 my_user.csv

  • csv文件中的列排序(注意比数据表中多了一列birthday)

https://static.duan1v.top/images/20230807201234.png
  • mysql的配置 /etc/mysql/mysql.conf.d/mysqld.cnf[mysqld] 选项添加配置,重启mysql
1
 secure-file-priv=/tmp
  • csv文件需要放在上面的目录(/tmp)下

  • sql语句

1
LOAD DATA INFILE '/tmp/my_user.csv' INTO TABLE my_user FIELDS TERMINATED BY ',' ENCLOSED BY '"' LINES TERMINATED BY '\n' IGNORE 1 LINES (@dummy,name,age,email,country,type,@dummy,job,@dummy,@dummy,@dummy,@dummy) SET brief='这个人很低调.';
  • 括号中的列需要和csv中的列一致(顺序和数量)
  • 将数据表中需要导入的列对应写在括号内,不需要导入的数据表的列,用 @dummy 占位
  • 使用SET 指定列(brief)的值
https://static.duan1v.top/images/20230807205432.png

关于将大号Excel转为CSV

  • 使用的是 libreoffice
1
libreoffice --version
  • 使用的命令是
1
cd /tmp && soffice --headless --convert-to csv:"Text - txt - csv (StarCalc)":"44,34,0,1,1/1" my_user.xlsx --outdir ./
  • python的Modin+Dask待研究

google api 授权及使用 总结

控制台中的操作

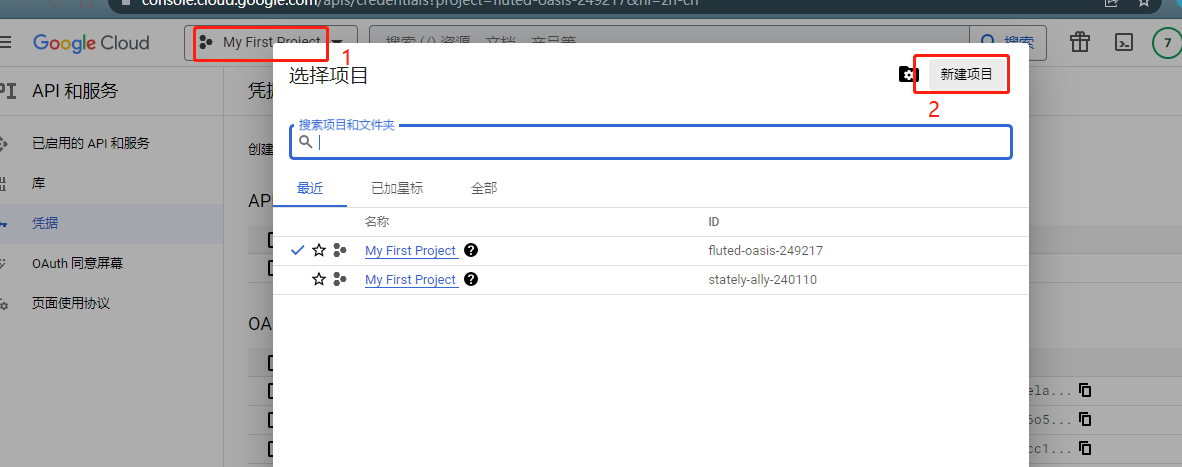
创建项目

https://static.duan1v.top/images/20230216223857.png

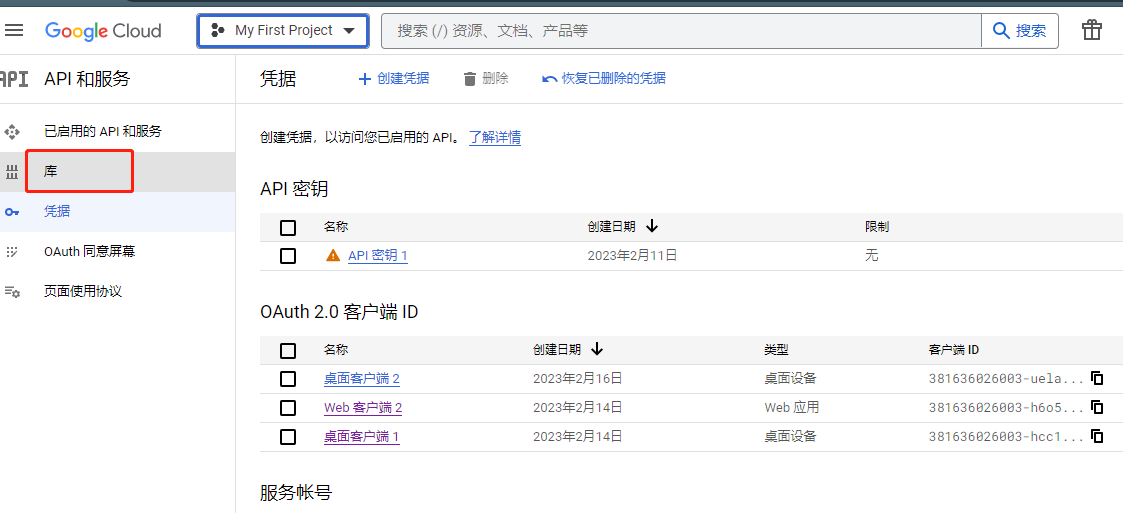
在库中选择需要的api,并启用

https://static.duan1v.top/images/20230216224808.png

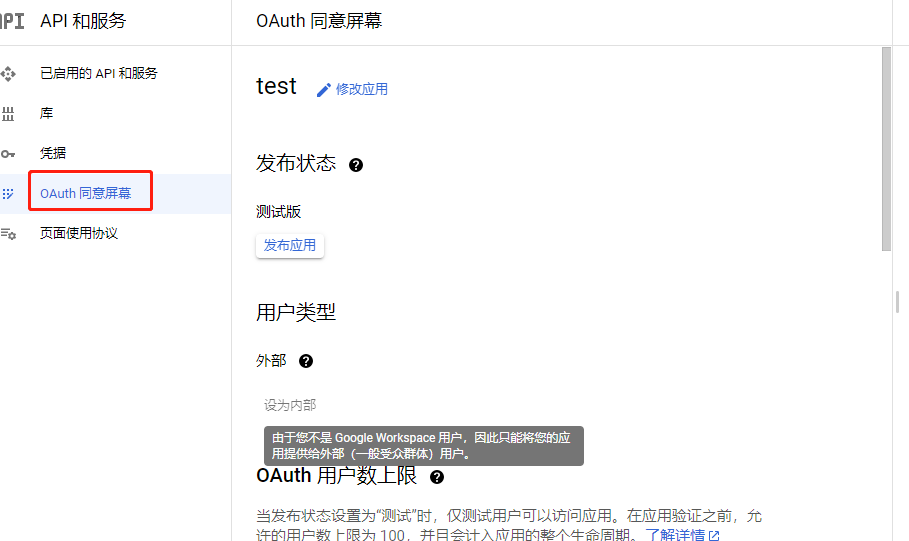
Oauth 同意屏幕配置授权应用基础信息及可调用接口范围

  • 个人账号只能配置为外部用户,需要配置测试用户及发布为正式应用;google suit的用户可以配置为内部用户
  • 第一页配置些应用的基本信息
  • 第二页配置的是授权后,应用内可以调用的接口
  • 个人账号只能配置为外部用户,需要配置测试用户,可以是自己的账号
https://static.duan1v.top/images/20230216225207.png

配置凭据

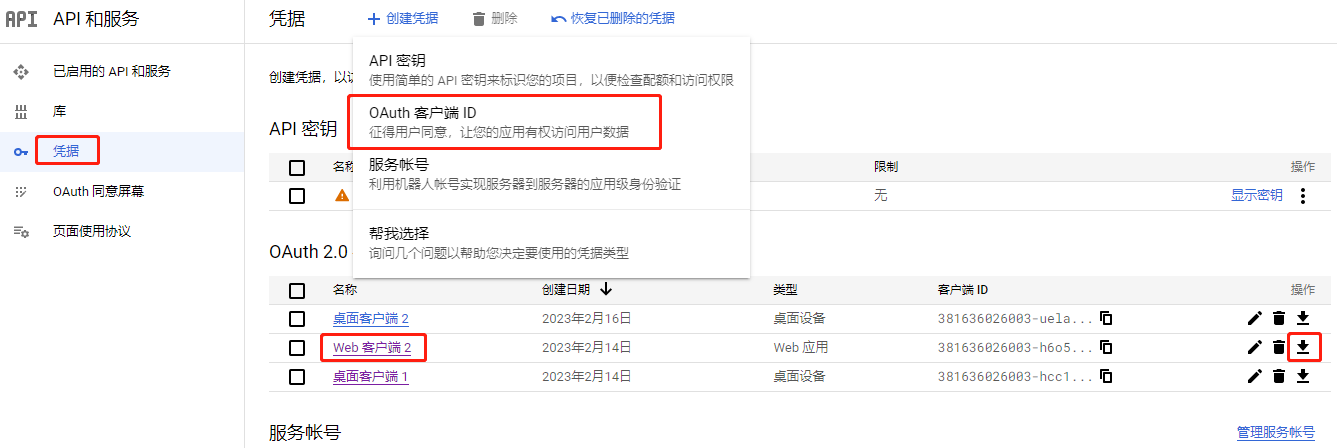
OAuth客户端授权

  • 需要通过下载的凭据生成授权跳转链接,获取code,生成token.json

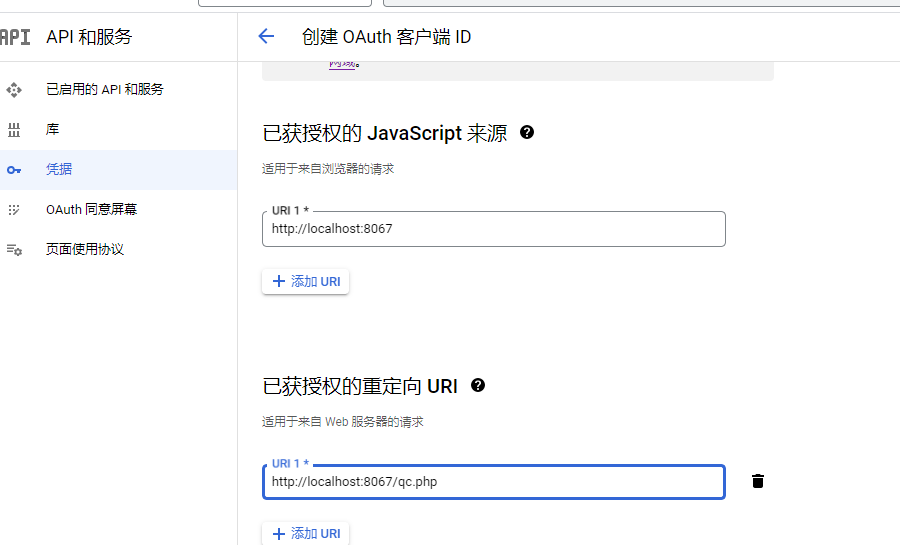
  • 新建web应用类型的凭据,并配置授权完成后的跳转地址,可以写需要的授权那个页面地址,本地可以配置为localhost

  • 下载凭证

https://static.duan1v.top/images/20230216230330.png https://static.duan1v.top/images/20230217000810.png

服务端授权

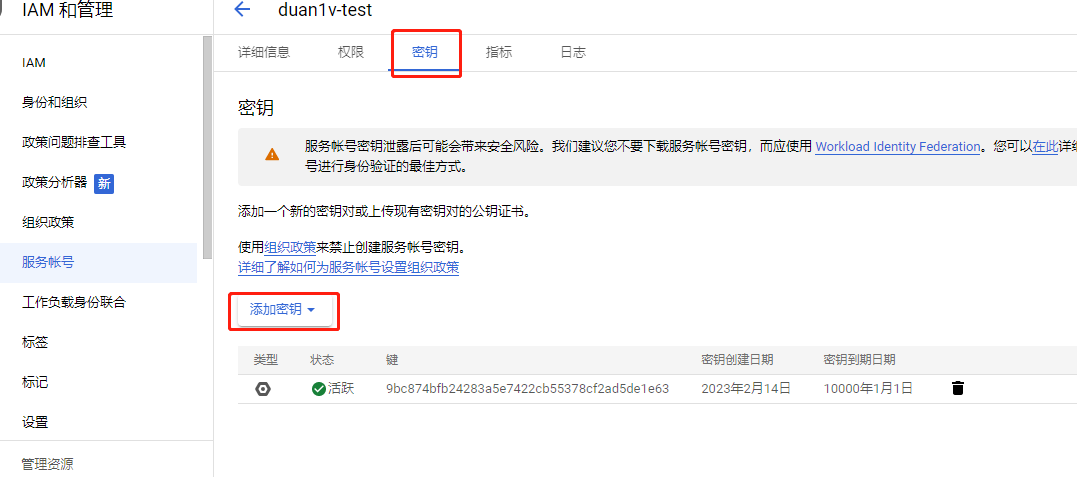
  • 本意是通过公私钥匹配,使应用中可以在服务端直接调用接口,无需进行授权交互

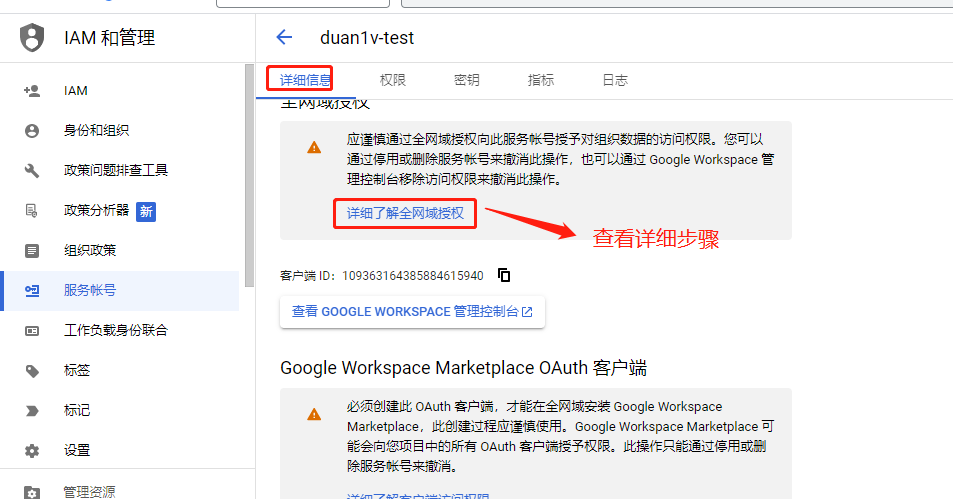
  • 创建完成后要继续编辑,添加密钥,及配置全网域(个人账号无法配置)

https://static.duan1v.top/images/20230216231734.png https://static.duan1v.top/images/20230216233017.png

测试用例

引入google api包

1
composer require google/apiclient:^2.12.1

使用凭据

客户端授权

 1
 2
 3
 4
 5
 6
 7
 8
 9
10
11
12
13
14
15
16
17
18
19
20
21
22
23
24
25
26
27
28
29
30
31
32
33
34
35
36
37
38
39
40
41
42
43
44
45
46
47
48
49
50
51
52
53
54
55
56
57
58
59
60
61
62
63
64
65
66
<?php

require __DIR__ . '/vendor/autoload.php';

use Google\Client;
use Google\Service\Gmail;

function getLabels()
{
    $client = new Client();
    $client->setApplicationName('Gmail API PHP Quickstart');
    $client->setScopes('https://www.googleapis.com/auth/gmail.readonly');
    $client->setAuthConfig("client_secret.json");
    $client->setAccessType('offline');
    $client->setPrompt('select_account consent');
    $tokenPath = "token.json";
    if (file_exists($tokenPath)) {
        $accessToken = json_decode(file_get_contents($tokenPath), true);
        $client->setAccessToken($accessToken);
    } else if ($authCode = $_GET["code"]) {
        // Exchange authorization code for an access token.
        $accessToken = $client->fetchAccessTokenWithAuthCode($authCode);
        $client->setAccessToken($accessToken);

        // Check to see if there was an error.
        if (array_key_exists('error', $accessToken)) {
            throw new \Exception(join(', ', $accessToken));
        }
        // Save the token to a file.
        if (!file_exists(dirname($tokenPath))) {
            mkdir(dirname($tokenPath), 0700, true);
        }
        file_put_contents($tokenPath, json_encode($client->getAccessToken()));
    }

    // If there is no previous token or it's expired.
    if ($client->isAccessTokenExpired()) {
        // Refresh the token if possible, else fetch a new one.
        if ($client->getRefreshToken()) {
            $client->fetchAccessTokenWithRefreshToken($client->getRefreshToken());
        } else {
            // Request authorization from the user.
            $authUrl = $client->createAuthUrl();
            header("Location: " . $authUrl);
        }
    }
    try {
        $service = new Gmail($client);
        // Print the labels in the user's account.
        $user = 'me';
        $results = $service->users_labels->listUsersLabels($user);

        if (count($results->getLabels()) == 0) {
            print "No labels found.\n";
        } else {
            print "Labels:\n";
            foreach ($results->getLabels() as $label) {
                printf("- %s\n", $label->getName());
            }
        }
    } catch (\Exception $e) {
        echo "Message: " . $e->getMessage();
    }
}

getLabels();
  • 页面授权
https://static.duan1v.top/images/20230217001106.png https://static.duan1v.top/images/20230217001518.png

服务端授权

1
2
3
$gmailService = new Google_Service_Gmail($client);

$labels = $gmailService->users_labels->listUsersLabels("me");
 1
 2
 3
 4
 5
 6
 7
 8
 9
10
11
12
13
14
PHP Fatal error:  Uncaught Google\Service\Exception: {
  "error": {
    "code": 400,
    "message": "Precondition check failed.",
    "errors": [
      {
        "message": "Precondition check failed.",
        "domain": "global",
        "reason": "failedPrecondition"
      }
    ],
    "status": "FAILED_PRECONDITION"
  }
}

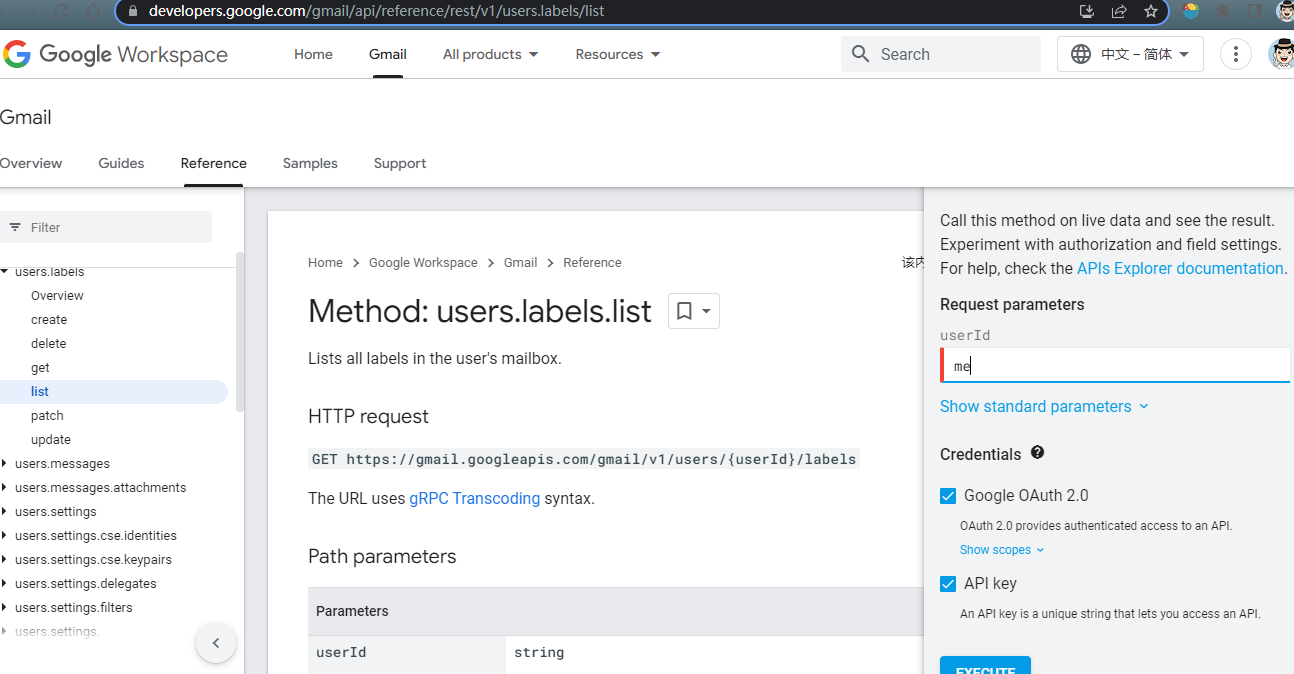
调试接口

https://static.duan1v.top/images/20230217005004.png

git相关

场景一

1
2
go env -w GONOPROXY=私有仓地址
go env -w GOPRIVATE=私有仓地址
  • 选择:SSH时,参考中可能有误,应如下替换
1
git config --global url."git@私有仓地址:".insteadOf "https://私有仓地址/"

场景二

1
git rebase -i {本次开发,自己第一次提交的前一次commit-id}

将除了第一行之外的所有 pick 改为 f, 保存退出

1
2
git rebase --continue
git push -f
  • git rebase -i

只能基于master分支,在自己本次的开发分支使用

只能合并日志,美化 git log 输出,每次提交还是能看到的

ps:更换编辑器命令 sudo update-alternatives --config editor

换行符警告

 1
 2
 3
 4
 5
 6
 7
 8
 9
10
$ git commit -am "XXXXXX。"
warning: LF will be replaced by CRLF in XXXXXX.
The file will have its original line endings in your working directory
warning: LF will be replaced by CRLF in XXXXXX.
The file will have its original line endings in your working directory
warning: LF will be replaced by CRLF in XXXXXX.
The file will have its original line endings in your working directory
warning: LF will be replaced by CRLF in XXXXXX.
The file will have its original line endings in your working directory
……
  • 解决
1
2
$ git config --global core.autocrlf false
$ git config --global core.safecrlf false

再写一些基础操作吧

获取别人刚才推的远程分支,需要先

1
git fetch

从master检出一个开发分支

1
git checkout -b some-dev origin/master

开发之后,发现分支选错了

  • 还未提交
1
2
3
git stash
git chekout {对的分支}
git stash pop # 或者 git stash apply
  • 已经提交,要在上面的步骤加上
1
git reset {该次提交的前一次commit-id} # 注意不要加上参数 --hard
  • 更改文件权限
1
2
git update-index --chmod=+x script.sh
# git update-index --chmod=+x *.sh
  • git解除对文件的版本控制
1
2
3
4
# 本地保留文件
git rm --cached test.txt 
# 删除本地文件
git rm --f test.txt

ssh使用代理登录及创建隧道

两种方式

  • 使用Xshell或者SecureCRT
  • 命令行

工具获取

  • 使用命令行时,windows需要connect.exe;linux需要netcat。后者下载方便,先提供前者下载链接(360会报有风险,我用着没事): connect.exe
  • 下载完成后放到 C:\Windows\System32 文件夹,或者自行配置环境变量

Xshell连接

先与普通ssh连接一样

再在 连接->代理 里点击 浏览->添加代理;注意选择代理的类型

隧道

  • 访问源端口,即可访问到目标端口;
  • 连接->ssh->隧道 里可直接添加;
  • 查看->隧道窗格->转移规则 中可看到隧道是否建立成功
  • PS:如果是有用WSL2,需要访问本地隧道端口,需要使用主机地址加端口

命令行

windows

  • 先找到ssh文件夹,我的是在

C:\Users\Administrator.ssh

  • 编辑 config 文件 ,替换掉中文部分;connect 命令中的参数 -S 是指定使用 socks 5 协议,也可以使用 -H 来使用 HTTP 协议来代理
1
2
3
4
5
6
7
Host 一个代号而已
HostName 需要ssh上去的那台服务器地址
User 用户名
Port 端口
PreferredAuthentications publickey
IdentityFile ~/.ssh/密钥文件
ProxyCommand connect -H 代理服务器的地址:端口 %h %p
  • 建立隧道(源端口:目标)
1
ssh -fNg -L 8084:127.0.0.1:9090 {config文件中的Host}

linux

  • 连接同上,ProxyCommand 命令改为,其中 nc 命令中的参数 -X 5 指定代理协议为 socks 5 ,如果是 socks 4 则写为 -X 4 ,如果是 HTTPS 代理则为 -X connect:
1
 nc -X connect -x 代理服务器的地址:端口 %h %p
  • 建立隧道(源:目标)
1
ssh -L localhost:8084:127.0.0.1:9090 -N -f {config文件中的Host}

参考

依赖注入和控制反转

Prerequisites

代码的作用

  • 程序是写给机器运行的,代码是写给人维护的

封装调用

  • 对于一个程序来说,完全可以写在一个文件中,且从头到尾,需要什么,都直接写,而非封装调用;也就是只通过各个语言编写最基础的cpu指令,比如加减、逻辑运算(或与非等)、流程控制(for|if等),连语言标准库中的函数都不事用
  • 也可以对于重复的代码进行封装,待需要的时候进行调用

优雅的代码

  • 在我看来,代码的优雅至少应该是:基于逻辑性强、可读性强的一种简洁;所以封装是必须的
  • 在封装调用中,就分成了调用方与模块(被调用方);调用方功能的实现是离不开模块的,也就是说调用方是依赖模块的
  • 如何调用这些依赖呢?

依赖注入(Dependency Injection)和控制反转(Inversion Of Control)

  • 在我看来,控制反转就是以细化功能为前提,降低调用方对模块的依赖,不用管模块的实现方式,达到模块自行控制的目的;
  • 依赖注入是控制反转的手段,常用的有构造方法入参,setter方法,这些都是一次性的,就是指不同的调用者调用不同的模块是没有什么优化的
  • 这些模块如果是经常被使用的,比如日志服务,那么这些调用就是属于重复操作了,可以再进一步封装,服务容器就是引入一个中间人,经常使用的那些模块先注册,调用方在用的时候直接获取就行了

laravel中的服务容器

  • laravel的服务容器就是Illuminate\Foundation\Application

常用的模块绑定到服务容器的方式

  • 绑定闭包
1
2
3
$this->app->bind('HelpSpot\API', function ($app) {
    return new HelpSpot\API($app['HttpClient']);
});
  • 绑定单例
1
2
3
$this->app->singleton('FooBar', function ($app) {
    return new FooBar($app['SomethingElse']);
});
  • 绑定实例
1
2
3
$fooBar = new FooBar(new SomethingElse);

$this->app->instance('FooBar', $fooBar);
  • 上下文绑定
1
2
3
4
5
$this->app->when('App\Handlers\Commands\CreateOrderHandler')
        ->needs('App\Contracts\EventPusher')
        ->give(function () {
          // Resolve dependency...
        });

常用的调用方式

1
2
3
4
5
6
7
8
$this->app->make('TestService');
// 或
$this->app['TestService'];
// 或
App::make('reports');
// 传参的话:
$this->app->makeWith(TestService::class, ['id' => 1]);
// 也可以来个facade直接调方法

laravel的服务容器在每一次解析对象时都会触发一个事件,可以使用resolving方法监听该事件

1
2
3
4
5
6
7
$this->app->resolving(function ($object, $app) {
    // 容器解析所有类型对象时调用
});

$this->app->resolving(function (FooBar $fooBar, $app) {
    // 容器解析"FooBar"对象时调用
});

本文参考

Go测试

单元测试

普通测试

规则

  • 测试文件以 _test.go 为后缀;测试函数以 Test 为前缀

实践

  • 新建main_test.go
 1
 2
 3
 4
 5
 6
 7
 8
 9
10
11
12
13
14
15
16
17
18
19
20
21
22
23
24
25
26
27
28
29
30
31
32
33
34
35
36
37
38
39
40
41
42
43
44
45
46
47
48
49
50
package main

import (
	"fmt"
	"math/rand"
	"testing"
	"time"
)

func FbnqDp(n int) (s int) {
	dp := make([]int, n+1)
	dp[1] = 1

	for i := 2; i < n+1; i++ {
		dp[i] = dp[i-2] + dp[i-1]
	}

	return dp[n]
}

func Fbnq(n int) (s int) {
	if n <= 2 {
		return 1
	}
	return Fbnq(n-1) + Fbnq(n-2)
}

func TestFbnqDp(t *testing.T) {
	type args struct {
		n int
	}
	type fbnqDpTest struct {
		name  string
		args  args
		wantS int
	}
	tests := []fbnqDpTest{}
	rand.Seed(time.Now().Unix())
	for i := 0; i < 10; i++ {
		x := rand.Intn(30) + 1
		tests = append(tests, fbnqDpTest{name: fmt.Sprintf("TestFbnqDp(%d)", x), args: args{n: x}, wantS: Fbnq(x)})
	}
	for _, tt := range tests {
		t.Run(tt.name, func(t *testing.T) {
			if gotS := FbnqDp(tt.args.n); gotS != tt.wantS {
				t.Errorf("FbnqDp() = %v, want %v", gotS, tt.wantS)
			}
		})
	}
}
  • 执行测试
 1
 2
 3
 4
 5
 6
 7
 8
 9
10
11
12
13
14
15
16
17
18
19
20
21
22
23
24
25
➜  p3 go test -gcflags=all=-l  -v main_test.go                
=== RUN   TestFbnqDp
=== RUN   TestFbnqDp/TestFbnqDp(6)
=== RUN   TestFbnqDp/TestFbnqDp(2)
=== RUN   TestFbnqDp/TestFbnqDp(8)
=== RUN   TestFbnqDp/TestFbnqDp(1)
=== RUN   TestFbnqDp/TestFbnqDp(27)
=== RUN   TestFbnqDp/TestFbnqDp(22)
=== RUN   TestFbnqDp/TestFbnqDp(26)
=== RUN   TestFbnqDp/TestFbnqDp(27)#01
=== RUN   TestFbnqDp/TestFbnqDp(19)
=== RUN   TestFbnqDp/TestFbnqDp(3)
--- PASS: TestFbnqDp (0.00s)
    --- PASS: TestFbnqDp/TestFbnqDp(6) (0.00s)
    --- PASS: TestFbnqDp/TestFbnqDp(2) (0.00s)
    --- PASS: TestFbnqDp/TestFbnqDp(8) (0.00s)
    --- PASS: TestFbnqDp/TestFbnqDp(1) (0.00s)
    --- PASS: TestFbnqDp/TestFbnqDp(27) (0.00s)
    --- PASS: TestFbnqDp/TestFbnqDp(22) (0.00s)
    --- PASS: TestFbnqDp/TestFbnqDp(26) (0.00s)
    --- PASS: TestFbnqDp/TestFbnqDp(27)#01 (0.00s)
    --- PASS: TestFbnqDp/TestFbnqDp(19) (0.00s)
    --- PASS: TestFbnqDp/TestFbnqDp(3) (0.00s)
PASS
ok      command-line-arguments  0.007s
  • 参数说明: -v 表示显示每个用例的测试结果; -gcflags=all=-l 表示禁止 内联 ,详见 Testing flags

  • 执行测试时,可以指定文件,比如上面的命令中,main_test.go;如果被测试函数不在该文件中,不能指定文件

基准测试

规则

  • 测试文件以 _test.go 为后缀;测试函数以 Benchmark 为前缀

实践

  • main_test.go添加代码
1
2
3
4
5
6
7
func BenchmarkFbnq(b *testing.B) {
	Fbnq(30)
}

func BenchmarkFbnqDp(b *testing.B) {
	FbnqDp(30)
}
  • 执行测试
 1
 2
 3
 4
 5
 6
 7
 8
 9
10
11
➜  p3 go test -bench Fbnq -v main_test.go
# ……
goos: linux
goarch: amd64
cpu: Intel(R) Core(TM) i5-6200U CPU @ 2.30GHz
BenchmarkFbnq
BenchmarkFbnq-4         1000000000               0.009437 ns/op
BenchmarkFbnqDp
BenchmarkFbnqDp-4       1000000000               0.0000027 ns/op
PASS
ok      command-line-arguments  0.052s
  • 常用参数: -benchtime=50x 表示单次测试函数执行次数,50次; -benchtime=5s 表示单次测试的时间为5s; -bench Fbnq 表示函数名称中含有 Fbnq-count=1 表示执行几次完整的测试; -benchmem 表示内存使用情况

net测试

  • 新建 net_test.go
 1
 2
 3
 4
 5
 6
 7
 8
 9
10
11
12
13
14
15
16
17
18
19
20
21
22
23
24
25
26
27
28
29
30
31
32
33
34
35
36
37
38
39
40
41
42
43
44
45
46
47
48
49
50
51
package main

import (
	"io/ioutil"
	"net"
	"net/http"
	"net/http/httptest"
	"testing"
)

func helloHandler(w http.ResponseWriter, r *http.Request) {
	w.Write([]byte("hello world"))
}

func handleError(t *testing.T, err error) {
	t.Helper()
	if err != nil {
		t.Fatal("failed", err)
	}
}

func TestConn(t *testing.T) {
	ln, err := net.Listen("tcp", "127.0.0.1:0")
	handleError(t, err)
	defer ln.Close()

	http.HandleFunc("/hello", helloHandler)
	go http.Serve(ln, nil)

	resp, err := http.Get("http://" + ln.Addr().String() + "/hello")
	handleError(t, err)

	defer resp.Body.Close()
	body, err := ioutil.ReadAll(resp.Body)
	handleError(t, err)

	if string(body) != "hello world" {
		t.Fatal("expected hello world, but got", string(body))
	}
}
func TestConn1(t *testing.T) {
	req := httptest.NewRequest("GET", "http://example.com/foo", nil)
	// 获取一个ResponseWriter,主要是为了测试 helloHandler 函数
	w := httptest.NewRecorder()
	helloHandler(w, req)
	bytes, _ := ioutil.ReadAll(w.Result().Body)

	if string(bytes) != "hello world" {
		t.Fatal("expected hello world, but got", string(bytes))
	}
}
  • 执行测试
1
2
3
4
5
6
7
➜  p14 go test -v net_test.go
=== RUN   TestConn
--- PASS: TestConn (0.00s)
=== RUN   TestConn1
--- PASS: TestConn1 (0.00s)
PASS
ok      command-line-arguments  0.005s

testify

安装

1
go get github.com/stretchr/testify

使用示例

 1
 2
 3
 4
 5
 6
 7
 8
 9
10
11
12
13
14
15
16
17
18
19
20
21
22
23
24
25
26
27
28
29
30
31
32
33
34
35
36
37
38
39
40
41
42
43
44
45
46
47
48
49
50
51
52
53
54
55
56
57
58
59
60
61
62
63
64
65
66
67
68
69
70
71
72
73
74
75
package main

import (
	"fmt"
	"testing"

	"github.com/stretchr/testify/assert"
	"github.com/stretchr/testify/suite"
)

type _Suite struct {
	suite.Suite
}

// SetupSuite() 和 TearDownSuite() 全局只会执行一次
// SetupTest() TearDownTest() BeforeTest() AfterTest() 对套件中的每个测试执行一次
func (s *_Suite) AfterTest(suiteName, testName string) {
	fmt.Printf("AferTest: suiteName=%s,testName=%s\n", suiteName, testName)
}

func (s *_Suite) BeforeTest(suiteName, testName string) {
	fmt.Printf("BeforeTest: suiteName=%s,testName=%s\n", suiteName, testName)
}

// SetupSuite() 仅执行一次
func (s *_Suite) SetupSuite() {
	fmt.Printf("SetupSuite() ...\n")
}

// TearDownSuite() 仅执行一次
func (s *_Suite) TearDownSuite() {
	fmt.Printf("TearDowmnSuite()...\n")
}

func (s *_Suite) SetupTest() {
	fmt.Printf("SetupTest()... \n")
}

func (s *_Suite) TearDownTest() {
	fmt.Printf("TearDownTest()... \n")
}
func FbnqDp(n int) (s int) {
	dp := make([]int, n+1)
	dp[1] = 1

	for i := 2; i < n+1; i++ {
		dp[i] = dp[i-2] + dp[i-1]
	}

	return dp[n]
}

func Fbnq(n int) (s int) {
	if n <= 2 {
		return 1
	}
	return Fbnq(n-1) + Fbnq(n-2)
}

func (s *_Suite) TestFbnq() {
	fmt.Printf("TestFbnq()... \n")
	ret := Fbnq(30)
	assert.Equal(s.T(), ret, 832040)
}

func (s *_Suite) TestFbnqDp() {
	fmt.Printf("TestFbnqDp()... \n")
	ret := FbnqDp(30)
	assert.Equal(s.T(), ret, 832040)
}

// 让 go test 执行测试
func TestAll(t *testing.T) {
	suite.Run(t, new(_Suite))
}
  • 执行测试
 1
 2
 3
 4
 5
 6
 7
 8
 9
10
11
12
13
14
15
16
17
18
19
20
21
➜  p15 go test -v tf_test.go -run TestAll
=== RUN   TestAll
SetupSuite() ...
=== RUN   TestAll/TestFbnq
SetupTest()... 
BeforeTest: suiteName=_Suite,testName=TestFbnq
TestFbnq()... 
AferTest: suiteName=_Suite,testName=TestFbnq
TearDownTest()... 
=== RUN   TestAll/TestFbnqDp
SetupTest()... 
BeforeTest: suiteName=_Suite,testName=TestFbnqDp
TestFbnqDp()... 
AferTest: suiteName=_Suite,testName=TestFbnqDp
TearDownTest()... 
TearDowmnSuite()...
--- PASS: TestAll (0.01s)
    --- PASS: TestAll/TestFbnq (0.01s)
    --- PASS: TestAll/TestFbnqDp (0.00s)
PASS
ok      command-line-arguments  0.013s

Ginkgo

安装

1
2
go install github.com/onsi/ginkgo/ginkgo
go get github.com/onsi/gomega/...

使用示例

  • 编写测试用例 books/books.go
 1
 2
 3
 4
 5
 6
 7
 8
 9
10
11
12
13
14
15
16
package books

type Book struct {
	Title  string
	Author string
	Pages  int
}

func (b *Book) CategoryByLength() string {

	if b.Pages >= 300 {
		return "NOVEL"
	}

	return "SHORT STORY"
}
  • 生成测试入口文件
1
2
3
4
5
6
7
➜  books ginkgo bootstrap                 
Generating ginkgo test suite bootstrap for books in:
        books_suite_test.go

Ginkgo 2.0 is coming soon!
==========================
# ……
  • 生成测试文件
1
2
3
4
5
6
7
8
  books ginkgo generate books
Generating ginkgo test for Books in:
  books_test.go


Ginkgo 2.0 is coming soon!
==========================
# ……
  • 编写测试文件
 1
 2
 3
 4
 5
 6
 7
 8
 9
10
11
12
13
14
15
16
17
18
19
20
21
22
23
24
25
26
27
28
29
30
31
32
33
34
35
36
37
38
39
40
41
42
43
package books_test

import (
	. "github.com/onsi/ginkgo"
	. "github.com/onsi/gomega"

	b "p15/books"
)

var _ = Describe("Book", func() {
	var (
		longBook  b.Book
		shortBook b.Book
	)

	BeforeEach(func() {
		longBook = b.Book{
			Title:  "Les Miserables",
			Author: "Victor Hugo",
			Pages:  1488,
		}

		shortBook = b.Book{
			Title:  "Fox In Socks",
			Author: "Dr. Seuss",
			Pages:  24,
		}
	})

	Describe("Categorizing book length", func() {
		Context("With more than 300 pages", func() {
			It("should be a novel", func() {
				Expect(longBook.CategoryByLength()).To(Equal("NOVEL"))
			})
		})

		Context("With fewer than 300 pages", func() {
			It("should be a short story", func() {
				Expect(shortBook.CategoryByLength()).To(Equal("SHORT STORY"))
			})
		})
	})
})
  • 执行测试
 1
 2
 3
 4
 5
 6
 7
 8
 9
10
11
12
13
➜  books go test -v p15/books/         
=== RUN   TestBooks
Running Suite: Books Suite
==========================
Random Seed: 1657256395
Will run 2 of 2 specs

••
Ran 2 of 2 Specs in 0.001 seconds
SUCCESS! -- 2 Passed | 0 Failed | 0 Pending | 0 Skipped
--- PASS: TestBooks (0.00s)
PASS
ok      p15/books       0.010s

mock测试

安装

1
go get -u github.com/golang/mock/gomock

使用示例

  • 测试用例: biz/user.go
 1
 2
 3
 4
 5
 6
 7
 8
 9
10
11
12
13
14
15
16
17
18
19
20
21
22
23
24
25
26
27
28
29
30
31
32
33
34
35
36
37
38
39
40
41
42
43
44
45
46
47
48
49
50
51
52
53
54
55
56
57
58
59
60
61
62
63
64
65
66
67
68
69
70
71
72
73
74
75
76
77
78
79
80
81
82
83
84
85
86
87
88
89
90
91
92
package biz

import (
	"gorm.io/driver/mysql"
	"gorm.io/gorm"
)

type User struct {
	ID       int64  `gorm:"primarykey"`
	Phone    string `gorm:"index:idx_phone;unique;type:varchar(11) comment '手机号码,用户唯一标识';not null"`
	Pwd      string `gorm:"type:varchar(100);not null "`
	Nickname string `gorm:"type:varchar(25) comment '用户昵称'"`
	Uname    string `gorm:"type:varchar(25) comment '用户名'"`
}

// 注意这一行新增的 mock 数据的命令 "p15/biz" 必须写全否则生成的测试文件引入包报错
//go:generate mockgen -destination=../mock/mrepo/user.go -package=mrepo "p15/biz" UserRepo
type UserRepo interface {
	CreateUser(*User) (*User, error)
	GetUserById(id int64) (*User, error)
}

type userRepo struct {
	db *gorm.DB
}

func NewUserRepo() *userRepo {
	mysqlSource := "dywily:q123456we@tcp(127.0.0.1:3306)/first?charset=utf8mb4&parseTime=True&loc=Local"
	db, err := gorm.Open(mysql.Open(mysqlSource), &gorm.Config{})

	if err != nil {
		panic("failed to connect database")
	}

	return &userRepo{db: db}
}

type UserUsecase struct {
	repo UserRepo
}

func NewUserUsecase(repo UserRepo) *UserUsecase {
	return &UserUsecase{repo: repo}
}

func (uc *UserUsecase) Create(u *User) (*User, error) {
	return uc.repo.CreateUser(u)
}

func (uc *UserUsecase) UserById(id int64) (*User, error) {
	return uc.repo.GetUserById(id)
}

func (r *userRepo) CreateUser(u *User) (*User, error) {
	var user User
	// 验证是否已经创建
	result := r.db.Where(&User{Phone: u.Phone}).First(&user)
	if result.RowsAffected == 1 {
		panic("用户已存在")
	}

	user.ID = u.ID
	user.Uname = u.Uname
	user.Phone = u.Phone
	user.Nickname = u.Nickname
	user.Pwd = u.Pwd
	res := r.db.Create(&user)
	if res.Error != nil {
		panic(res.Error.Error())
	}

	return &User{
		ID:       user.ID,
		Phone:    user.Phone,
		Pwd:      user.Pwd,
		Nickname: user.Nickname,
		Uname:    user.Uname,
	}, nil
}

func (r *userRepo) GetUserById(Id int64) (*User, error) {
	var user User
	result := r.db.Where(&User{ID: Id}).First(&user)
	if result.Error != nil {
		return nil, result.Error
	}

	if result.RowsAffected == 0 {
		panic("用户不存在")
	}
	return &user, nil
}
  • 生产mock文件
1
mockgen -destination=../mock/mrepo/user.go -package=mrepo "p15/biz" UserRepo

或者

https://static.duan1v.top/images/739b9926034d7e1172c6f6e0961a47d2.png
go-test
  • 编写测试文件 biz/biz_suite_test.go
 1
 2
 3
 4
 5
 6
 7
 8
 9
10
11
12
13
14
15
16
17
18
19
20
21
22
23
24
25
26
package biz_test

import (
	"testing"

	"github.com/golang/mock/gomock"
	. "github.com/onsi/ginkgo"
	. "github.com/onsi/gomega"
)

func TestBiz(t *testing.T) {
	RegisterFailHandler(Fail)
	RunSpecs(t, "biz user test")
}

var ctl *gomock.Controller
var cleaner func()

var _ = BeforeEach(func() {
	ctl = gomock.NewController(GinkgoT())
	cleaner = ctl.Finish
})
var _ = AfterEach(func() {
	// remove any mocks
	cleaner()
})
  • 编写测试文件 biz/user_test.go
 1
 2
 3
 4
 5
 6
 7
 8
 9
10
11
12
13
14
15
16
17
18
19
20
21
22
23
24
25
26
27
28
29
30
31
32
33
34
35
36
37
38
39
40
41
42
43
44
45
46
47
48
49
50
51
52
53
54
55
56
57
58
59
60
61
62
63
64
65
66
67
68
69
package biz_test

import (
	"p15/mock/mrepo"

	"p15/biz"

	"github.com/golang/mock/gomock"
	. "github.com/onsi/ginkgo"
	. "github.com/onsi/gomega"
)

var _ = Describe("UserUsecase", func() {
	var userCase *biz.UserUsecase
	var mUserRepo *mrepo.MockUserRepo
	info := &biz.User{}
	BeforeEach(func() {
		mUserRepo = mrepo.NewMockUserRepo(ctl)
		userCase = biz.NewUserUsecase(mUserRepo)
		info = &biz.User{
			ID:       3,
			Phone:    "15866547585",
			Pwd:      "admin123456",
			Nickname: "hahaha",
			Uname:    "hahaha",
		}
	})

	It("Create", func() {
		// 这里不会在数据库中创建
		mUserRepo.EXPECT().CreateUser(gomock.Any()).Return(info, nil)
		l, err := userCase.Create(info)
		Ω(err).ShouldNot(HaveOccurred())
		Ω(err).ToNot(HaveOccurred())
		Ω(l.ID).To(Equal(int64(3)))
		Ω(l.Phone).To(Equal("15866547585"))
	})

	It("UserById", func() {
		mUserRepo.EXPECT().GetUserById(gomock.Any()).Return(info, nil)
		user, err := userCase.UserById(3)
		Ω(err).ShouldNot(HaveOccurred())
		Ω(user.Phone).Should(Equal("15866547585"))
	})
})

var _ = Describe("User", func() {
	var ro biz.UserRepo
	var uD *biz.User
	BeforeEach(func() {
		ro = biz.NewUserRepo()
		uD = &biz.User{
			ID:       4,
			Phone:    "18655864568",
			Pwd:      "admin123",
			Nickname: "hahaha",
			Uname:    "hahaha",
		}
	})
	It("CreateUser", func() {
		// 这里会真的在数据库中创建
		ro.CreateUser(uD)
	})
	It("GetUserById", func() {
		user, err := ro.GetUserById(4)
		Ω(err).ShouldNot(HaveOccurred())
		Ω(user.Phone).Should(Equal("18655864568"))
	})
})
  • 目录结构
 1
 2
 3
 4
 5
 6
 7
 8
 9
10
11
12
13
14
➜  p15 tree .
.
├── biz
│   ├── biz_suite_test.go
│   ├── user.go
│   └── user_test.go
├── go.mod
├── go.sum
├── main.go
└── mock
    └── mrepo
        └── user.go

3 directories, 7 files
  • 执行测试
 1
 2
 3
 4
 5
 6
 7
 8
 9
10
11
12
13
14
15
16
17
18
19
➜  p15 go test  p15/biz/ -v
=== RUN   TestBiz
Running Suite: biz user test
============================
Random Seed: 1657254031
Will run 4 of 4 specs


2022/07/08 12:20:31 /mnt/g/Workspace/go/docker/p15/biz/user.go:58 record not found
[0.800ms] [rows:0] SELECT * FROM `users` WHERE `users`.`phone` = '18655864568' ORDER BY `users`.`id` LIMIT 1

2022/07/08 12:20:31 /mnt/g/Workspace/go/docker/p15/biz/user.go:68 SLOW SQL >= 200ms
[264.312ms] [rows:1] INSERT INTO `users` (`phone`,`pwd`,`nickname`,`uname`,`id`) VALUES ('18655864568','admin123','hahaha','hahaha',4)
••••
Ran 4 of 4 Specs in 0.274 seconds
SUCCESS! -- 4 Passed | 0 Failed | 0 Pending | 0 Skipped
--- PASS: TestBiz (0.27s)
PASS
ok      p15/biz 0.286s

本文参考